
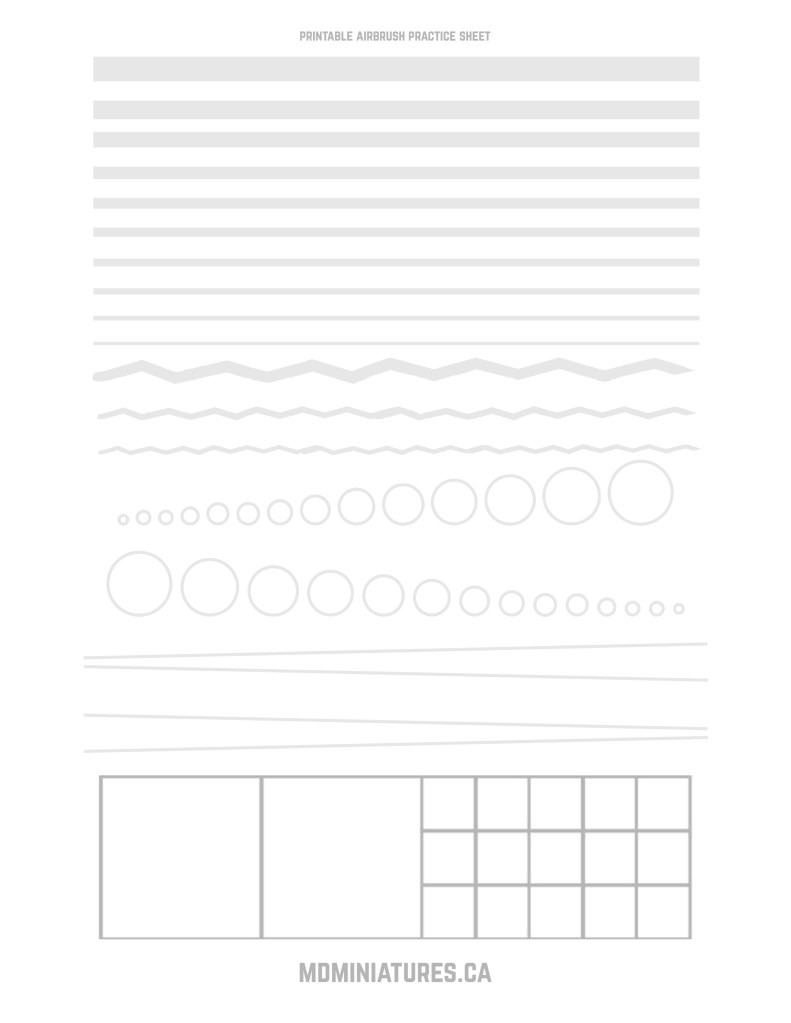
Practice makes perfect. Here’s a copy of an airbrush practice sheet I made for our airbrush course. It is available for free, so you can just download it and print as many copies as you need.
Learning to airbrush has four really complex aspects. Thinning paint, Cleaning an airbrush, troubleshooting, and learning trigger control. This sheet helps with the latter.
I’m not a big fan of cooking blogs that share a life story and needless information before the actual recipe, so I won’t do you like that. Click here to download the airbrush practice sheet as a pdf.
The good news about trigger control is that for most of what we do in miniature painting, you need very little of it to go a long way. Airbrushes are not exclusive to miniatures, far from it. Compared to airbrushing a photorealistic portrait, or touching up eyelashes on a black and white photo, base coating Brother Steve the Ultramarine is a quite easy task.
Airbrush Practice 101
Before we start, two things you need to know.
First, full disclaimer, this sheet is mostly overkill. With miniatures, you rarely, if ever, need to actually draw a straight and even line. But learning how to do it does make you understand how to control the trigger, and have a steady hand. So while you’re not actively painting lines, those 2 aspects separately are fundamentals.
Which brings me to my second point: do whatever you feel like with it. It doesn’t need to be pretty, you don’t need to “complete” it, in fact, some beginner airbrushes can’t handle the finer details on that sheet. When you’re done, throw it away, or start over. No one ever needs to see it.
The goal is to get progressively better and learn the basics, not to produce beautiful artwork on this sheet. So trash it, start over, draw between the lines, and then throw it away. Remember, the real goal is not to paint straight lines, it’s to learn to control your airbrush.
While you can save this image that is already in printable format, you can also download the pdf from the top of this page
How to use this sheet
Here’s how the airbrush practice sheet was designed, and how I showed people who took my intro to airbrush course.
Lines
Match the lines. The goal is to not only be as straight as possible, but also as even as possible. You can also try to replicate each line in between. Freehanding it is often easier than following the printed one.
ZigZags
Sort of the same, except now your line is not quite straight. The extra challenge with this is to keep the top and bottom the same width as the line. If you stop when the line changes angle, you’ll get a dot on each end. So try to not do that.
Dots
The goal here is to produce a single spray that matches each dot. You don’t want to paint around the dot and then fill it.
Of course, once you’re done with the dots, you can try to paint the border of the circle. Unlike our lines from before, the circle does not have a beginning and an end, so any change in your spray’s width will be obvious.
Cones
These cones are quite challenging to get perfectly. They are a mix of the lines and the dot practice. Start at the narrow end, and spray towards the wide end, keeping your spray as close to the lines as possible as you go.
This means you have to gradually pull the trigger, while you are moving your spray in a straight line. Then start at the wide end and work your way to the narrow end, easing off the trigger as you go.
Boxes
The Boxes are for coloring. There are many effects to practice with these.
First, try to fill a box completely, without going over the line. The center of the square will be quite easy, but getting the edges as crisp as possible is the real challenge.
Another great technique to practice is blending. Start left to right, so the left side of the square has barely any color, and the right side is almost opaque. The idea is to get this as smooth as possible. You can do up/down as well, or try to leave the center of the square untouched as you blend your color towards the edges.
Taking It Up a Notch
The bonus round is obviously to write over the text at the top and the bottom of the page. It’s small, and the characters are more complex than our practice sheet’s shapes.
Again, because it can’t be overstated: The real goal is not to make the sheet perfectly, the goal is to learn to control your airbrush.
If you feel like you’d benefit from a more thorough approach to learn how to airbrush, have a look at the Introduction to Airbrushing Miniatures course I made.

Leave a comment